There are a wide variety of temperature sensors compatible with Arduino, ESP32, ESP8266 and other development boards. So, it can be difficult to to pick up the most suitable sensor for your project. In this article, we’ll compare 6 widely used temperature sensors: DHT11, DHT22, LM35, DS18B20, BME280 and BMP180.

We’ll compare the sensors when it comes to communication protocol, temperature range, accuracy, ease of use and much more.
We also run a simple experiment in which we measured the temperature in the same environment using all temperature sensors over time. With this experiment we could see how the sensors react to temperature changes. We’ve ran this experiment for approximately 36 hours and we’ll show you the results later in this article.
Recommended Reading: 9 Arduino Compatible Temperature Sensors For Your Electronics Projects
Comparing Temperature Sensors: DHT11 Vs DHT22 Vs LM35 Vs DS18B20 Vs BME280 Vs BMP180
For a quick comparison of the sensors, we’ve put together the following table that shows the most important information when it comes to select a temperature sensor namely: communication protocol, supply voltage, temperature range and accuracy.
Note: the table scrolls horizontally both on desktop computer, tablet and mobile.
| Sensor | DHT11 | DHT22 (AM2302) | LM35 | DS18B20 | BME280 | BMP180 |
| Measures | Temperature Humidity | Temperature Humidity | Temperature | Temperature | Temperature Humidity Pressure | Temperature Pressure |
| Communication Protocol | One-wire | One-wire | Analog | One-wire | I2C SPI | I2C |
| Supply Voltage | 3 to 5.5V DC | 3 to 6V DC | 4 to 30 V DC | 3 to 5.5V DC | 1.7 to 3.6V (for the chip) 3.3 to 5V for the board | 1.8 to 3.6V (for the chip) 3.3 to 5V for the board |
| Temperature Range | 0 to 50ºC | -40 to 80ºC | -55 to 150ºC | -55 to 125ºC | -40 to 85ºC | 0 to 65ºC |
| Accuracy | +/- 2ºC (at 0 to 50ºC) | +/- 0.5ºC (at -40 to 80ºC) | +/-0.5ºC (at 25ºC) | +/-0.5ºC (at -10 to 85ºC) | +/-0.5ºC (at 25ºC) | +/-0.5ºC (at 25ºC) |
| Support (Arduino IDE) | Adafruit DHT Library Adafruit Unified Sensor Library | Adafruit DHT Library Adafruit Unified Sensor Library | analogRead() | DallasTemperature OneWire | Adafruit BME280 Library Adafruit Unified Sensor Library | Adafruit BME085 Adafruit Unified Sensor Library |
| Support (MicroPython) | Dht module (included in MicroPython firmware) | Dht module (included in MicroPython firmware) | from machine import ADC ADC().read | Ds18b20 module (included in MicroPython firmware) | BME280 Adafruit Library | BMP180 Module |
| Where To Buy? | Check Prices | Check Prices | Check Prices | Check Prices Check Prices (Waterproof) | Check Prices | Check Prices |
DHT11 Vs DHT22 (AM2302)

The DHT11 and DHT22 (AM2302) are digital temperature sensors that measure temperature and humidity. They look very similar and work the same way, but have different specs.
Both sensors can be powered either with 3.3V or 5V. So, you can easily use them in your Arduino or ESP projects.
The DHT22 sensor has a better resolution and a wider temperature and humidity measurement range. However, it’s a bit more expensive and you can only request readings with 2 seconds interval.
The DHT11 is slightly cheaper, it has a smaller range, and it’s less accurate. But you can get sensor readings every second.
Despite their differences, they work in a similar way, and you can use the same code to read temperature and humidity. You just need to select in the code the sensor type you’re using.
So, if you’re willing to spend an extra dollar, we recommend the DHT22 over the DHT11.
We have several guides on how to use the DHT11 and DHT22 sensors:
- ESP32 (Arduino IDE) With DHT11/DHT22 Temperature And Humidity Sensor
- ESP8266 (Arduino IDE) DHT11/DHT22 Temperature And Humidity Web Server
- Arduino With DHT11/DHT22 Humidity And Temperature Sensor
- ESP32/ESP8266 (MicroPython) With DHT11/DHT22 Web Server
LM35, LM335 And LM34

The LM35, LM335 and LM34 are linear temperature sensors that output a voltage proportional to the temperature value. The LM35 comes calibrated in Celsius degrees, the LM335 in Kelvin and the LM34 in Fahrenheit. So, depending on the temperature units you’ll use in your project, one of these sensors might be more practical than the other.
We recommend using the LM35 or LM34 instead of the LM335, because subtracting a large number to the LM335 measurements to convert the temperature from Kelvin can compromise the results accuracy.
According to the datasheet, the LM35 and LM34 sensors require very little current to operate, about 60uA. This results in very low self-heating (around 0.08ºC in still air), which means that the temperature measurements won’t be affected by the sensor itself.
To read the temperature from these sensors you just need to read the sensor’s output voltage using an analog pin. If using an Arduino, you just need to use the analogRead() function and you’ll get temperature readings with two decimal points.
So, if you need a cheap and easy to use sensor to monitor temperature, the LM35 can be a good option. Also, because it consumes very little energy, it’s great for portable projects, where low power consumption is required.
Learn how to use the LM35, LM335 and LM34 temperature sensors with Arduino:
DS18B20 Temperature Sensor

The DS18B20 Temperature Sensor is a one-wire digital temperature sensor. This means that it just requires one data line (and GND) to communicate with your microcontrollers.
It can be powered by an external power supply or it can derive power from the data line (called “parasite mode”), which eliminates the need for an external power supply.
Each DS18B20 temperature sensor has a unique 64-bit serial code. This allows you to wire multiple sensors to the same data wire. So, you can get temperature from multiple sensors using a single GPIO.
Additionally, the resolution of the temperature sensor can be set to 9, 10, 11, or 12 bits which corresponds to increments of 0.5°C, 0.25°C, 0.125°C, and 0.0625°C, respectively. The default resolution at power-up is 12-bit.
The DS18B20 temperature sensor is also available in waterproof version, ideal for outdoor projects or to measure liquid temperature.

You can follow our guides to learn how to use the DS18B20 temperature sensor with the ESP32, ESP8266 and Arduino using Arduino IDE or MicroPython:
- ESP32 (Arduino IDE) DS18B20 Temperature Sensor (Single, Multiple, Web Server)
- ESP8266 (Arduino IDE) DS18B20 Temperature Sensor (Single, Multiple, Web Server)
- ESP32 And ESP8266 (MicroPython) With DS18B20 Temperature Sensor
- Arduino With DS18B20 Temperature Sensor
BME280 Vs BMP180

The BME280 and BMP180 are barometric sensors which means they read atmospheric pressure. The BME280 is also equipped with a temperature and a humidity sensor, and the BMP180 with a temperature sensor. Because pressure changes with altitude, these sensors can also be used to estimate altitude.
When it comes to temperature range, the BME280 has a wider measurement range: -40 to 85ºC, while the BMP180 just measures from 0 to 65ºC. You should keep in mind that the BME280 module self-heats a little bit, so the temperature measurements may be 1 ou 2 degrees above the real temperature value.
The BME280 can use either I2C or SPI communication protocol while the BMP180 can only use I2C communication.
The BME280 sensor is more expensive but it has more functionalities. For example, you can build a weather station project with only this sensor. But if you’re not interested in measuring the pressure or humidity, you can get a cheaper temperature sensor.
Interfacing these sensors with Arduino, ESP8266 and ESP32 is very easy thanks to the Adafruit libraries.
You can use our guides to learn how to use these sensors:
- BMP180:
- BME280:
We also have other projects with the BME280 that you may like:
- Low Power Weather Station Datalogger Using ESP8266 And BME280 With MicroPython
- ESP32 Web Server With BME280 – Mini Weather Station
- ESP32/ESP8266 Insert Data Into MySQL Database Using PHP And Arduino IDE
Testing All Temperature Sensors
This experiment logged temperature readings from different temperature sensors over time in the same conditions.

We wired all the following temperature sensors to an Arduino Mega:
The data was recorded on a microSD card using a MicroSD Card Module. The experiment run for approximately 36 hours and temperature readings were logged every 5 minutes.
We wired the data pins of the temperature sensors to the following pins on Arduino Mega:
- DHT11: Pin 11
- DHT22: Pin 12
- DS18B20: Pin 14
- LM35: Pin A0
- BME280: software SPI on these pins: Pin 4 (MISO), Pin 5 (CS), Pin 6 (SCK), Pin 7 (MOSI)
- BMP180: Pin 20 (SDA) and Pin 21 (CSL)
The microSD card module was connected via hardware SPI: Pin 51 (MOSI), Pin 50 (MISO), Pin 52 (SCK), Pin 53 (CS).
This is the code running in the Arduino Mega.
/*
 * Rui Santos
 * Complete Project Details https://RandomNerdTutorials.com
 */

#include "DHT.h"

#include <OneWire.h>
#include <DallasTemperature.h>

#include <Wire.h>
#include <SPI.h>
#include <Adafruit_Sensor.h>
#include <Adafruit_BME280.h>

#include <Wire.h>
#include <Adafruit_BMP085.h>

#include <SD.h> // for the SD card

const int DHT11sensorPin = 11;
const int DHT22sensorPin = 12;

DHT dht11(DHT11sensorPin, DHT11);
DHT dht22(DHT22sensorPin, DHT22);

float DHT11temperature;
float DHT22temperature;

const int DS18B20sensorPin = 14;

OneWire oneWire(DS18B20sensorPin);
DallasTemperature ds18b20(&oneWire);

float DS18B20temperature1;
float DS18B20temperature2;

const int BME_SCK = 6;
const int BME_MISO = 4;
const int BME_MOSI = 7;
const int BME_CS = 5;

Adafruit_BME280 bme280(BME_CS, BME_MOSI, BME_MISO, BME_SCK);

Adafruit_BMP085 bmp180;

const int LM35sensorPin = A0;
float LM35sensorValue;
float LM35voltageOut;
float LM35temperature;

const int chipSelectSDCard = 53;
File myFile;

void setup() {
  Serial.begin(9600);

  dht11.begin();
  delay(2000);
  dht22.begin();

  ds18b20.begin();

  bme280.begin();

  bmp180.begin();

  pinMode(LM35sensorPin, INPUT);

  if(!SD.begin(chipSelectSDCard)) {
    Serial.println("SD card initialization failed!");
    return;
  }
  Serial.println("SD card initialization done.");

  myFile=SD.open("DATA.txt", FILE_WRITE);
  if (myFile) {
    Serial.println("File opened ok");
    // print the headings for our data
    myFile.println("DHT11,DHT22,DS18B20-1,DS18B20-2,BME280,BMP180,LM35");
  }
  myFile.close();
}

void loop() {

  /*-------------------------------------------------------*/
  //DHT11
  DHT11temperature = dht11.readTemperature();
  if (isnan(DHT11temperature)) {
    Serial.println("Failed to read from DHT11 sensor!");
    return;
  }
  Serial.print("Temperature DHT11(ºC): ");
  Serial.println(DHT11temperature);

  /*-------------------------------------------------------*/
  //DHT22
  DHT22temperature = dht22.readTemperature();
  if (isnan(DHT22temperature)) {
    Serial.println("Failed to read from DHT22 sensor!");
    return;
  }
  Serial.print("Temperature DHT22(ºC): ");
  Serial.println(DHT22temperature);

/*-------------------------------------------------*/
  //DS18B20
  ds18b20.requestTemperatures();
  DS18B20temperature1 = ds18b20.getTempCByIndex(0);
  DS18B20temperature2 = ds18b20.getTempCByIndex(1);

  Serial.print("Temperature DS18B20-1(ºC): ");
  Serial.println(DS18B20temperature1);

  Serial.print("Temperature DS18B20-2(ºC): ");
  Serial.println(DS18B20temperature2);

/*-------------------------------------------------*/
//BME280

  Serial.print("Temperature BME280(ºC): ");
  Serial.println(bme280.readTemperature());

/*-------------------------------------------------*/
//BMP180
  Serial.print("Temperature BMP180(ºC): ");
  Serial.println(bmp180.readTemperature());

/*-------------------------------------------------*/
  //LM35 SENSOR
  LM35sensorValue = analogRead(LM35sensorPin);
  LM35voltageOut = (LM35sensorValue * 5000) / 1024;

  // calculate temperature for LM35 (LM35DZ)
  LM35temperature = LM35voltageOut / 10;

  Serial.print("Temperature LM35(ºC): ");
  Serial.println(LM35temperature);

  Serial.println("");

  myFile = SD.open("DATA.txt", FILE_WRITE);
  if (myFile) {
    Serial.println("File open with success");
    myFile.print(DHT11temperature);
    myFile.print(",");
    myFile.print(DHT22temperature);
    myFile.print(",");
    myFile.print(DS18B20temperature1);
    myFile.print(",");
    myFile.print(DS18B20temperature2);
    myFile.print(",");
    myFile.print(bme280.readTemperature());
    myFile.print(",");
    myFile.print(bmp180.readTemperature());
    myFile.print(",");
    myFile.print(LM35temperature);
    myFile.println(",");
  }
  myFile.close();

  delay(6000);
}
Note: in order to compile and run this code, you must install in your Arduino IDE all sensor libraries mentioned in the comparison table at the beginning of this article.
Results: Comparing Temperature Readings
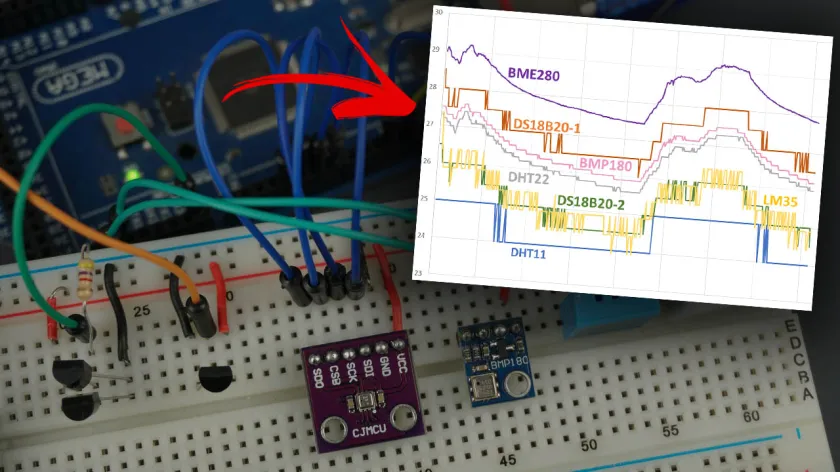
After approximately 36 hours, we removed the microSD card and copied the results to a spreadsheet. We’ve plotted all readings to better compare the measurements from the different temperature sensors.


This chart doesn’t have a control group (we didn’t use a calibrated temperature sensor), but we have an idea on how these sensors behave.
If you take a closer look at the charts, the BME280 measured slightly higher values than the other temperature sensors. This behavior is normal, and this is described in the datasheet. The module self-heats a little bit and the temperature measurements can be 1 ou 2 degrees above the real temperature value.
However, the BME280 is also the temperature sensor that gave more stable temperature readings without many oscillations between readings. This has to do with the resolution of the sensor. It can detect changes up to 0.01ºC.
In case of the DS18B20 temperature sensors, we can see some oscillations between readings and it’s also noticeable that the resolution is not as good as the BME280. Additionally, the DS18B20 temperature sensor was the only one to give some “null” readings throughout the experiment. We’ve measured two DS18B20 temperature sensors in the same data line and one of the sensors failed to read the temperature 6 times throughout the experiment (during 36 hours).
The DHT22 and the BMP180 behave very similarly with little oscillations. The DHT11 couldn’t detect small temperature changes, because its resolution is of 1ºC.
Finally, the LM35 temperature sensor detected changes in temperature between 24ºC and 26ºC but with lots of oscillations between measurements.
This chart comparing the different temperature sensors clearly shows how each sensor differs from the others. It is easier to understand how they work and if they will be suitable for the projects you want to build.
Wrapping Up
In this article we’ve compared several temperature sensors that you can use with the ESP32, ESP8266, Arduino and other development boards. These sensors all measure temperature but they behave differently when put to the test in the same environment at the same time.
We hope you’ve found this article useful and that it helps you pick the best temperature sensor for your project requirements.